Hello beautiful crafters! If you are someone who gardens a lot or has recently started gardening, loves to craft but maybe doesn’t have much experience, you’re in the right place.
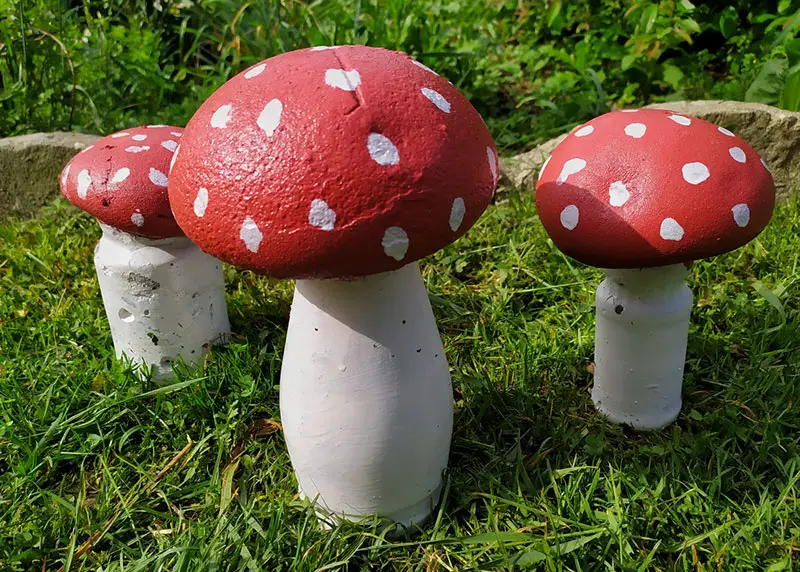
Concentre Garden Mushrooms are eco-friendly, durable, stunning, and incredibly easy to make.
This is also something that will undoubtedly outlast any plants you have in your garden. You can always make more or paint over this project with acrylic paint.
Before we get into it, don’t forget to look at the supplies you might need and some color inspiration.
Craft Supplies You Will Need
- Sand
- Cement
- Water
- Old or any stretchable cloth (it will get stained and muddy)
- Gloves
- Vase/ Plastic container
- Scissors
- Plastic band or wire
- Sock
- Spatula
- Sandpaper
- Plastic cover
- Acrylic paint
- Paintbrush
- Varnish
- Two Buckets
- Spoon
What You Should Know Before Starting
- For best results, you will want to use nylon socks. Otherwise, you can use your hands to form the shape directly.
- Make sure when you use your hands to mold the stem have one flat bottom at one end and a pointed tip at the other
- You can use a dauber for the mushroom dots for better and accurate results. It is recommended for those who want a more effortless and clean dot. All you have to do is dip your dauber in the white acrylic paint and gently tap where you want each dot on the mushroom head.
- If you are worried about your mushroom’s durability due to weather conditions, you may apply an extra layer of glue between the stem and the mushroom head. It is recommended that you space the first coating from the second for a minimum of twenty minutes.
- When it comes to preventing your mushrooms from water damage, apply two to three layers of varnish.
Mushroom Color Combinations
While you are free to use any color scheme you like, here are some of our favorite mushroom paint colors to use:
- White dots, Orange top, and Brown base
- Brown top and white base
- Purple top and brown base
- Blue top and white dots
- Black top, white dots, and orange base
There are so many different fun color combinations to try.

How to Make Concrete Garden Mushrooms, Step by Step
Step One: Lay down a plastic cover to protect your flooring or for an easy cleanup
Step Two: Glove up and wear old clothing when making the concrete mushrooms.
Step Three: Feel free to use a vase or a plastic container for the next step.
Step Four: Start by creating your concrete mixture
Step Five: Mixture: cement, water, and sand (sand can be optional)
Step Six: Mix it all together for at least one minute with a spatula
Step Seven: Place any type of clothing that you don’t mind getting stained and muddy next to your mixture (potentially will become non-reusable)
Step Eight: Transfer the mixture to the piece of clothing of your choice and tie it up with a plastic band or a wire, or simply tie it up in a knot
Step Nine: Get an empty bucket and place it upside down
Step Ten: Place the mixture on top of the bucket (you’re actually setting the mixture on the base of the bucket that typically sits on the ground). This will be the cap of your mushroom. * You will need a new empty bucket, nylon sock, and your concrete mixture for the next few steps. If your sock is too long, you will want to cut it in half and give it a knot.
Step Eleven: Place your bucket upright and cover the top with a sock
Step Twelve: Using a spoon, pour the mixture into the sock
Step Thirteen: Once you are done tying up your stocking, use your hands to mold:
- The base
- One round bottom
- One pointed tip
Now let them dry for five hours. After you let it dry, remove as much of the clothing as possible. Now that you have a base and top, it’s time to connect them.
Step Fourteen: Use the same mixture as before and add it to the inside of your top piece
Step Fifteen: Place the pointed side of your base inside the mushroom cap.
Let it dry in that same position for 12 hours.
Step Sixteen: Once it’s dry, flip the mushroom upright and use the sandpaper to remove all the extra grit to smooth and refine your concrete mushroom.
Step Seventeen: All that’s left now is paint. Get creative and have fun! You may or may not need to cover your mushroom a few coats; it just depends on the color shade and the paint quality.
Step Eighteen: Place your mushroom in your garden, and enjoy your beautiful piece of artwork. Congratulations, you’re finished!
This video shows you how to make concrete garden mushrooms.
If you want to learn how to make your own garden ornaments, follow along as she walks you through the steps. She begins by showing all of the materials you will need for this project and items to make a stepping stones project. Each of the specific products that are used for this DIY are shown in detail. There are also some tips and tricks on how to pour and set the concrete as well as how to attach the stem and top of the mushroom. The project runs over the course of several days to allow for drying and the video uses time-lapse to reflect this. This tutorial helps you create a decorative addition to your garden.
Make sure to watch both parts of this series below!
Part 1
Watch Part 2 of the Concrete Garden Mushrooms